System Version
Not specified
Status
basic
Last Update
2024-06-21
RT-Thread VisionFive 2 Test Report
Test Environment
System Information
- Host: Arch Linux
- Reference Installation Document: https://doc.rvspace.org/VisionFive2/Application_Notes/RT-Thread/index.html
Hardware Information
- StarFive VisionFive2
- Power Adapter
- Two USB to UART Debuggers (for connecting both Linux and RT-Thread)
Installation Steps
Building the System
Get the toolchain: scons
sudo pacman -Syu scons
# sudo apt-get install scons
Download the code:
git clone https://github.com/starfive-tech/VisionFive2.git
cd VisionFive2
git checkout --track origin/rtthread_AMP
git submodule update --init --recursive
Initialize the repository:
cd buildroot && git checkout --track origin/JH7110_VisionFive2_devel && cd ..
cd u-boot && git checkout --track origin/rtthread_AMP && cd ..
cd linux && git checkout --track origin/rtthread_AMP && cd ..
cd opensbi && git checkout rtthread_AMP && cd ..
cd soft_3rdpart && git checkout JH7110_VisionFive2_devel && cd ..
cd rtthread && git checkout rtthread_AMP && cd ..
Download the toolchain:
wget https://github.com/starfive-tech/rt-thread/blob/rtthread_AMP/toolchain/tool-root1.tar.gz
sudo tar xf rtthread/toolchain/tool-root1.tar.gz -C /opt/
Ensure that git-lfs is installed and enabled in your environment! Otherwise, you will encounter compilation errors (issue #5)[https://github.com/starfive-tech/VisionFive2/issues/5]
Compile:
# scons --menuconfig # 若需配置再运行
make -j($nproc)
Note: Compilation takes a long time; maintain a good network connection and be patient for several hours.
Running the System
Connect the two debug serial ports, the RTOS setup is as shown:
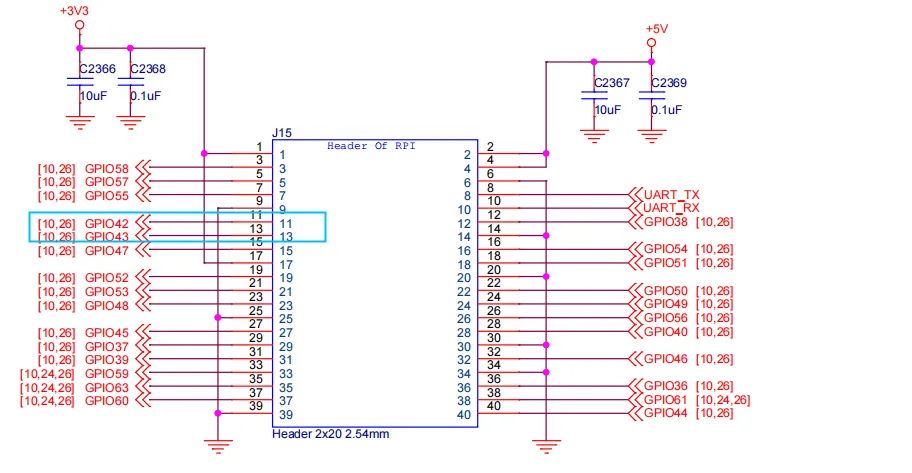
Pin9, Pin11, and Pin13 form a complete serial port: Pin9 (GND) Pin11 (GPIO42): UART1 RX Pin13 (GPIO43): UART1 TX
Flash the compiled u-boot-spl.bin.normal.out and visionfive2_fw_payload.img files. The official tutorial suggests flashing to flash memory, which can be referenced here: Updating u-boot and SPL.
Alternatively, you can flash to an SD card to avoid overwriting the original boot. Since visionfive2_fw_payload.img exceeds 4M and cannot be directly replaced, this method requires building a rootfs. Below is an example of flashing to an SD card. First, prepare the VisionFive2 SD card image.
make buildroot_rootfs -j$(nproc)
make img
Then, flash the image:
sudo dd if=work/sdcard.img of=/dev/ of=/dev/your-device bs=1M status=progress
sync
Note that with this method, you need to set the boot to start from the SD card.
Expected Results
The system should boot up normally and allow login via the serial port.
Actual Results
The system booted successfully and login via the serial port was also successful.
SBI: OpenSBI v1.2
SBI Specification Version: 1.0
heap: [0x6f000000 - 0x70000000]

 \ | /
- RT -     Thread Operating System
 / | \     5.1.0 build Mar 28 2024 14:25:42
 2006 - 2022 Copyright by RT-Thread team
lwIP-2.0.3 initialized!
Hello RISC-V
Hello Starfive RT-Thread! CPU_ID(4)
rpmsg linux test: receive data from linux then send back
rpmsg remote: remote core cpu_id-4
rpmsg remote: shmem_base-0x6e410000 shmem_end-0x6e7fffff
Test Criteria
Successful: The actual result matches the expected result.
Failed: The actual result does not match the expected result.
Test Conclusion
Test successful.
Source: Support Matrix